Recipe Time!
You may be wondering about that title but that's what I'm calling the dinner I made last night. It's my take on a combination of Southwestern and Mexican food in casserole form. Some of my friends have made a Mexican-ish casserole before but I didn't have the recipe so figured I would whip up something on my own, adding in some of our favorite ingredients.
Before I get to the ingredients, let me just say it turned out delicious!!! That's one reason I am typing up this post now so I won't forget how I made it. It is also very easy to put together. I used frozen veggies because I had them on hand. It saves some prep time if you don't have to chop up fresh ones. I loves them for soups and recipes like this one.
1 lb ground chuck
1/2 cup each of frozen chopped onions and green bell pepper
1 packet of taco seasoning
1 can whole kernel corn, drained
1 can black beans, drained and rinsed
5-6 large flour tortillas
1/2 cup chicken broth
1 bag of shredded Mexican mix cheese
Optional - 1 cup sharp shredded cheese
Preheat oven to 350 degrees. Brown the ground chuck (I seasoned with salt, pepper & garlic powder) and drain off any fat/grease. Add frozen veggies and taco seasoning mix. Follow the instructions on the seasoning packet for how much water to be added and how long to simmer the mixture. Once the taco meat/veggies are done, add the corn and black beans stirring until combined.
Grease a 9x13 pan. Using a pie plate or something similar, pour in the chicken broth and dip the tortillas until soaked. Line the pan with a layer of tortillas. You will have to tear them to fit right. Add a third of the meat mixture to the tortillas. Add a layer of cheese. Repeat for two more layers, ending with cheese on top. I also added a little bit of shredded sharp cheddar cheese just because I love cheese :)
Bake for 25-30 minutes. This is great by itself but you could also serve with salsa or any other toppings you like. I was going to add some Spanish rice to the casserole but I was trying to hurry with dinner and forgot to make it. Oh well, maybe next time.
Now I'm going to be honest about why there are no pictures. It doesn't look very pretty. I am a visual person when it comes to food and I didn't want anyone to get the wrong impression and not even try this dish. The pictures I took of it just did not do it justice and I am choosing not to display any :) Just trust me when I say this meal is delicious!
Enjoy!

Tuesday, March 29, 2011
Monday, March 28, 2011
Thinking Pink...In the Office
The office/craft room and little bit of play room is finally starting to pull together. I have finished a few projects for the space, including my yellow wreath and thrift store office chair. Now one more is checked off the list, a pink lamp!
You know most of us if not all went through the pink phase as a young girl and most likely had a pink room. That was definitely me. I loved pink. When my mom asked me what kind of party I wanted for my third birthday, I replied "Pink!" And that's exactly what I got...EVERYTHING was pink :) I even got a pink tricycle.
Here's a little bit of proof that Mom just sent me...excuse the busted lip, there's no telling how that one happened.

I eventually grew out of the "everything must be pink" phase and have never really used it in my home as an adult. Until now. No, it's not going to look like Pepto Bismol barfed everywhere but I'm excited to incorporate these fun pops of pink. I think the color just screams feminine and that's exactly what the majority of the space will be...except for my little P's nook. Side note: Yellow is also my accent color for this space. I love the combo!
But back to the lamp. I found this at a local flea market for $8.00. And it is huge!!! And obviously hideous as is. But she spoke to me and found her way into the back of my car. At this point I didn't know what color to paint it but I knew I wanted a bold color to make it pop.


So when I decided on my color scheme for this room I knew pink was the answer. Rust-Oleum's Berry Pink, to be more specific.

So after I got the lamp all cleaned up, I sprayedseveral a few coats until she was nice and glossy and PINK!
The shade it came with was not going to cut it so I went out searching for a replacement. I found one at Target and purchased it...$22.00. Is that a good price for a large lampshade? I'm kind of clueless in that area. So I'm not sure if I'm keeping it, hence the plastic still showing in the pictures. I may try to find a better deal so in the meantime, it will continue to live with it's plastic wrap.
Here she is!


Overall I am totally digging this fun lamp in my office. And if you are wondering what it is sitting on, that's just a sneak peak of my revamped credenza! It's done except I am still searching for the right drawer pulls. One was missing so I can't use the originals. I'm hoping to find them soon!
And here's a little ambience lighting for ya.


L.O.V.E.
Can't wait to share more of the space soon!


You know most of us if not all went through the pink phase as a young girl and most likely had a pink room. That was definitely me. I loved pink. When my mom asked me what kind of party I wanted for my third birthday, I replied "Pink!" And that's exactly what I got...EVERYTHING was pink :) I even got a pink tricycle.
Here's a little bit of proof that Mom just sent me...excuse the busted lip, there's no telling how that one happened.

I eventually grew out of the "everything must be pink" phase and have never really used it in my home as an adult. Until now. No, it's not going to look like Pepto Bismol barfed everywhere but I'm excited to incorporate these fun pops of pink. I think the color just screams feminine and that's exactly what the majority of the space will be...except for my little P's nook. Side note: Yellow is also my accent color for this space. I love the combo!
But back to the lamp. I found this at a local flea market for $8.00. And it is huge!!! And obviously hideous as is. But she spoke to me and found her way into the back of my car. At this point I didn't know what color to paint it but I knew I wanted a bold color to make it pop.


So when I decided on my color scheme for this room I knew pink was the answer. Rust-Oleum's Berry Pink, to be more specific.

So after I got the lamp all cleaned up, I sprayed
The shade it came with was not going to cut it so I went out searching for a replacement. I found one at Target and purchased it...$22.00. Is that a good price for a large lampshade? I'm kind of clueless in that area. So I'm not sure if I'm keeping it, hence the plastic still showing in the pictures. I may try to find a better deal so in the meantime, it will continue to live with it's plastic wrap.
Here she is!


Overall I am totally digging this fun lamp in my office. And if you are wondering what it is sitting on, that's just a sneak peak of my revamped credenza! It's done except I am still searching for the right drawer pulls. One was missing so I can't use the originals. I'm hoping to find them soon!
And here's a little ambience lighting for ya.


L.O.V.E.
Can't wait to share more of the space soon!
Partying Here!

Saturday, March 26, 2011
Francine Rivers
Oh how I love Mrs. Rivers' books. She is without a doubt my favorite author. I get completely giddy when a new book of hers comes out. If you are looking for some great Christian fiction books, look no further. Every book of hers that I have read (which is just about all of them) is phenomenal. My absolute favorite series is the Mark of the Lion trilogy. I can read that series over and over and it never gets old. She recently released a two-part series of books, Her Mother's Hope and Her Daughter's Dream. Her book tour for Her Daughter's Dream came to our city and yours truly was ecstatic!
A friend of mine and myself went down to get our books signed by Francine and of course I brought my camera. She was very sweet and listened to the two of us babble like idiots and gush about how much we loved her books. I'm sure it wasn't the first time she experienced a pair like us :)
And here is our photo that I framed and hugged for 3 days. Okay, not really. But I am absolutely thrilled to have gotten a photo with Francine!!!!
Cheese!

The fab news is Francine's publishing company, Tyndale House Publishers, is having a giveaway of Francine's books! The grand prize winner gets her entire library of books and several more winners get some of her other awesome novels.
To enter you can do one or all of the below criteria. You get one entry per item you complete. Do all three and get three chances to win!
Per Tyndale's Blogpage:
Go check out the website and complete the entry form, marking which items you completed to enter the contest. Trust me, you want to get your hands on as many books of Francine's as possible.
Best of luck!
A friend of mine and myself went down to get our books signed by Francine and of course I brought my camera. She was very sweet and listened to the two of us babble like idiots and gush about how much we loved her books. I'm sure it wasn't the first time she experienced a pair like us :)
And here is our photo that I framed and hugged for 3 days. Okay, not really. But I am absolutely thrilled to have gotten a photo with Francine!!!!
Cheese!

The fab news is Francine's publishing company, Tyndale House Publishers, is having a giveaway of Francine's books! The grand prize winner gets her entire library of books and several more winners get some of her other awesome novels.
To enter you can do one or all of the below criteria. You get one entry per item you complete. Do all three and get three chances to win!
Per Tyndale's Blogpage:
- “Like” the Francine Rivers Facebook page
- Invite at least 10 friends to “Like” the Francine Rivers Facebook page (using the “share” link of Facebook or through e-mail).
- Share this contest on your blog, Twitter, or Facebook page.
Go check out the website and complete the entry form, marking which items you completed to enter the contest. Trust me, you want to get your hands on as many books of Francine's as possible.
Best of luck!
Thursday, March 24, 2011
Quickies
Alright, get your mind out of the gutter. This isn't that kind of blog my friends.
I'm referring to some quick thrifty makeovers that I just love. I have ahuge little problem with starting too many projects at once. I can't help it. That's how my brain works. I have an idea and I want to do it then. And I simply rotate projects until they are all done :) Hubby doesn't understand my mentality but hey, it works for me.
So in the midst of some larger projects I have going on, I up and decided to tackle a few pieces to help update my spring decor. And since I hadn't used my new Oops paint in 24 hours, I was itching to break out the paint brush.
I had some TJ Max frames in my living room that were pretty but blended in with my dark walls. I was just sitting there staring at them and said "I'm going to go paint those frames" and up I went to the garage, frames in tow. Hubby is calling after me "Do you really have to paint everything in the house?" We shall see...
Both frames Before...


I used a foam brush and applied the same technique as I did on my bedroom wall plaques. I painted the larger frame with some leftover paint, Behr's Swiss Coffee. And I painted the smaller frame with my grey blue Oops paint.
In addition to the frames, I spray painted a thrift store candlestick a nice glossy white.
Here's a Before of the candlestick. $2.99!


And the After of the larger white frame. Sorry the lighting was bad on this photo. Little P was only 9 months old here, sweet boy.

A total improvement on these little lovelies. It truly is amazing what a little paint can do. I'm hooked!
I'm referring to some quick thrifty makeovers that I just love. I have a
So in the midst of some larger projects I have going on, I up and decided to tackle a few pieces to help update my spring decor. And since I hadn't used my new Oops paint in 24 hours, I was itching to break out the paint brush.
I had some TJ Max frames in my living room that were pretty but blended in with my dark walls. I was just sitting there staring at them and said "I'm going to go paint those frames" and up I went to the garage, frames in tow. Hubby is calling after me "Do you really have to paint everything in the house?" We shall see...
Both frames Before...


I used a foam brush and applied the same technique as I did on my bedroom wall plaques. I painted the larger frame with some leftover paint, Behr's Swiss Coffee. And I painted the smaller frame with my grey blue Oops paint.
In addition to the frames, I spray painted a thrift store candlestick a nice glossy white.
Here's a Before of the candlestick. $2.99!

And the After of the candlestick and the smaller blue frame. Perfect for our family beach picture :)


A total improvement on these little lovelies. It truly is amazing what a little paint can do. I'm hooked!
Sunday, March 20, 2011
My Girl...Office Chair
Another item checked off the to-do list for my new office/craft room. I am slowly but surely completing the pieces to get this room finished!
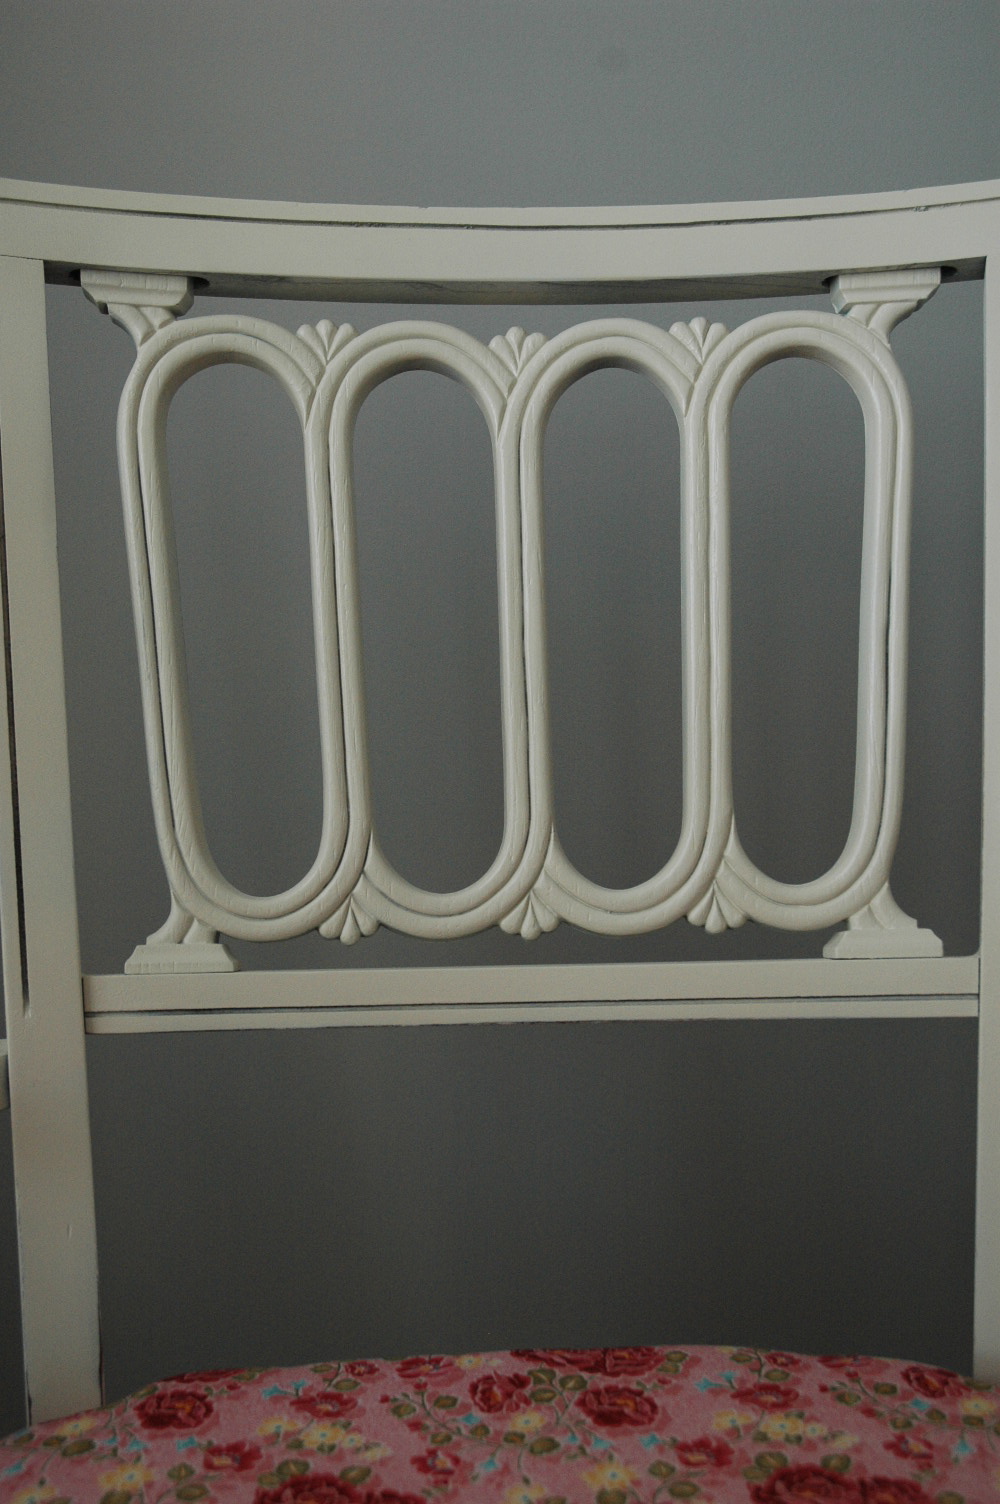
I picked up this chair at a thrift store for $10.00. I thought the back of the chair had a lovely design. All it needed was some reinforcement, new paint and a new cushion.
Okay, before all the details I'll be nice and let you see the Before and After :)
And the Icky Before...

Drumroll please...Ta Da!

Total girl chair :) :) :) :) Me likey.
Now onto the lovely details.
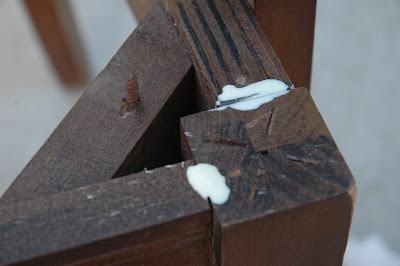
The first thing I did was remove the cushion. It was very simple. There were four screws in the bottom of the chair and I loosened them up and the cushion popped right off.
Next up I gave it a good sanding and wiped it down. It was a little rickety so I blobbed wood glue down in between the joints. Now obviously I am no pro but this process seemed to work :) I wiped away the excess and let it dry overnight.


After the primer was completely dry, I lightly sanded it down to smooth out the surface. This is definitely a step you don't want to skip. It certainly makes a difference. I used Rustoleum's Heirloom White and coated the chair about 3 times. I also bought one of these handy little spray guns for like three bucks. It's totally worth it. It helps get a smooth spray and also avoids the annoying finger cramp from holding down the nozzle.

Once again, after the paint completely dried, I lightly sanded out any rough bumpy areas and made it nice and smooth. I also sanded a few of the edges to give a little bit of the distressed look. I just couldn't resist...
And finally, I added a coat of Wipe on Poly to seal the paint and protect the surface. Sorry no pic of the Poly can. I forgot.
Now on to the seat cushion. The existing cushion was pretty thin and honestly grossed me out so I purchased a piece of foam, batting and of course my new fabric.
But before we get to the new stuff, I had to get rid of the old...ugh. There were 3 layers of fabric on top of the existing cushion. That also means there were 3 layers of old staples...each layer containing more rust than the last. I just knew I was going to end up jabbing myself and rushing to get a tetanus shot. But I was very careful and finally removed all of the nasty little things.
Once I got the base wiped free of rust dust I noticed it had some loose wood. Out came the wood glue again and I sealed 'er right up.

Alright, we are finally getting to the new cushion. I bought both my foam and batting at Hobby Lobby. It was about $10 for both items and I still have lots of batting leftover for future projects. I purchased my fabric at Hancock's for about $4.00.

This was my very first time to recover a chair so I kept avoiding this part as long as possible. But hello, gotta have a cushion for the chair, Laura. So I jumped in there and just learned as I went. My foam square was not quite as wide as I originally thought (note to self: measure before you go to the store) so I improvised. Since the back part of the base is cut to mold to the chair, I needed to cut my foam the same way. I took off a square chunk from each side of the back and put the two chunks up front. It made the front of the cushion be as wide as the base and make it even. Of course I didn't have enough to go all the way down the sides but I think it turned out just fine anyway.


I picked up this chair at a thrift store for $10.00. I thought the back of the chair had a lovely design. All it needed was some reinforcement, new paint and a new cushion.
Okay, before all the details I'll be nice and let you see the Before and After :)
And the Icky Before...

Drumroll please...Ta Da!

Total girl chair :) :) :) :) Me likey.
Now onto the lovely details.
The first thing I did was remove the cushion. It was very simple. There were four screws in the bottom of the chair and I loosened them up and the cushion popped right off.
 |
| A view of the |
 |
| Removing the cushion |
Next up I gave it a good sanding and wiped it down. It was a little rickety so I blobbed wood glue down in between the joints. Now obviously I am no pro but this process seemed to work :) I wiped away the excess and let it dry overnight.


Next I primed it with Rustoleum's white spray paint primer. I did a few coats and let it completely dry.


Once again, after the paint completely dried, I lightly sanded out any rough bumpy areas and made it nice and smooth. I also sanded a few of the edges to give a little bit of the distressed look. I just couldn't resist...
And finally, I added a coat of Wipe on Poly to seal the paint and protect the surface. Sorry no pic of the Poly can. I forgot.
Now on to the seat cushion. The existing cushion was pretty thin and honestly grossed me out so I purchased a piece of foam, batting and of course my new fabric.
But before we get to the new stuff, I had to get rid of the old...ugh. There were 3 layers of fabric on top of the existing cushion. That also means there were 3 layers of old staples...each layer containing more rust than the last. I just knew I was going to end up jabbing myself and rushing to get a tetanus shot. But I was very careful and finally removed all of the nasty little things.
Once I got the base wiped free of rust dust I noticed it had some loose wood. Out came the wood glue again and I sealed 'er right up.

Alright, we are finally getting to the new cushion. I bought both my foam and batting at Hobby Lobby. It was about $10 for both items and I still have lots of batting leftover for future projects. I purchased my fabric at Hancock's for about $4.00.

This was my very first time to recover a chair so I kept avoiding this part as long as possible. But hello, gotta have a cushion for the chair, Laura. So I jumped in there and just learned as I went. My foam square was not quite as wide as I originally thought (note to self: measure before you go to the store) so I improvised. Since the back part of the base is cut to mold to the chair, I needed to cut my foam the same way. I took off a square chunk from each side of the back and put the two chunks up front. It made the front of the cushion be as wide as the base and make it even. Of course I didn't have enough to go all the way down the sides but I think it turned out just fine anyway.

 |
| Warning: Blurry Photo Alert |
I then wrapped the batting snugly over the foam and stapled to the back. I started by stapling the center of each side and then worked my way around.


And side note. At this point I took the cushion inside to cut my fabric to fit and iron it. I left the cushion unattended in the floor while I ironed the fabric and when I returned, the cat had gotten on top of the cushion and rumpled up the nice and tight batting...he almost got booted off the blog for that little stunt. So I huffed and puffed at myself for leaving it alone with him snooping around and went back out to fix the damage. It wasn't too hard to fix so I apologized to him for my rudeness.
I stapled on the fabric and that was it - all done! I really love it. I wanted something very feminine and I think I pulled it off. The fabric pattern has little bits of yellow in the flowers so I think it's going to look great with the color scheme of the new space (grey, pink and yellow).
And a ton few more after pics.


And because I felt bad for getting on to him earlier...he forgave me :)

I hope you enjoyed the makeover. More to come!
Partying Here!
Subscribe to:
Posts (Atom)