Showing posts with label Thrifty Makeovers. Show all posts

Friday, June 22, 2012

Refinished Dresser

Good, I kept my word. I'm back with another post and it's not three months later :)

I knew I wanted to find baby girl an antique dresser as soon as we bought her crib. We lucked up and located a crib on Craigslist. Now here me out on this one. We didn't buy some nasty old bed for our precious little angel to sleep in. We browsed the baby furniture shops and the beds we liked were of course way too expensive for us. So after a day of window shopping, I decided to try Craigslist for this particular bed we liked - and there was one! It's this Bratt Decor Venetian Crib in antique white (I will have photos of it soon when I show her completed room). We went and checked it out first and the family was super sweet and their little girl had only used it for a year. We met her too and she was a doll. Anyway, they had the bed all set up and we looked it over really well and it was very sturdy and there was not a scratch to be found. And one of the pluses of a cast iron crib, no bite marks either. So anyway, we took it off their hands for half of the retail cost. Cha-ching!

But more on the crib later. Wasn't this post supposed to be about a dresser?

The search was on for an antique dresser that would compliment her crib. We looked at a few antique shops that had a few pieces already refinished but none that I really loved. Not to mention I could not find one that was the color I wanted and since the price of refinished furniture is already higher, I didn't want to put too much cost into something that I was going to change anyway.

After a trip to a local flea market (Gardendale Flea Market for anyone in Birmingham), I found this dresser sitting with a $100 price tag. Pardon the iphone pic.


I looked it over really well and it was in great shape. The drawers slid out nicely too. That's always something to check when looking at older pieces. I decided to see if I could get it for any less so the nice people at the flea market put in a call to the vendor and he said $85 was the best he could do - sold.  I thought it was a great deal for such a heavy, nice piece. It just needed a little love in the looks department.

We bought this while we were staying at my parents house during the interim of moving out of our old house and before finding our new one so it sat for a bit. Once we moved in the new house and settled down some it was time to waddle my pregnant self out to the garage to work on this baby. 

First thing was to remove all the drawers and hardware. 

My plan was to sand down the top portion and restain it and then paint the remaining portion an antique white to match the crib. The previous owners of our house left several cans of leftover paint and stain and wouldn't you know they left the color stain I wanted for this - Minwax Dark Walnut. Since that part was taken care of it was off to Lowe's to buy paint. I simply took the top finial from the crib and color matched for the perfect paint color. I used Valspar's Pontoon White in a semi-gloss finish.

My sweet husband did all the sanding for me with the power sander. For your FYI it does take a little bit of time to get it all off. And your hand may or may not shake for 30 minutes after you finish. But hey, my hubs is a sweetie and doesn't mind :) 

There was a small place at the back of the dresser that was messed up but a little wood filler took care of it. 

After cleaning the entire dresser like a crazy, nesting pregnant woman, (oh wait, that's what I was) I got to work priming. I decide to paint first before staining since I figured I was more likely to get paint on the top of the piece than to get stain on the paint. Make sense? Probably not. Anyway, moving on. I used my Zinnser oil based primer which does a great job.

These are the three products I used on the base of the dresser.


After sanding and priming.


After the primer dried for 24 hours I went back with the paint. I used Centsational Girl's recommedation for Floetrol (photo up above), which is a paint conditioner that you add to latex paint. It helps give a smoother finish which is great when you hand brush like I did. I was very pleased with it. I also went ahead and bought a good brush (Purdy) and it definitely made a difference. Its worth the extra money.

Here it is after painting two coats and sanding lightly in between each coat. Be sure you wipe it down before applying another coat of paint.


Next was the stain. This was my first time to stain a piece and it was actually very easy! I used a 2 inch foam brush and applied a nice even coat along the top. Then I waited about 20 minutes and removed the excess liquid by wiping it down carefully. I wanted a nice dark stain so that's why I left it on there so long. And that was it!

After the stain was dry I applied two coats of polycrylic to protect the surface and give it a nice sheen.

This is the stain and poly I used. I used the poly on the base of the dresser as well.


Then it was time to focus on the hardware. I liked the look of the original hardware but it was very dull and gross. I washed it all with soap and hot water and then cleaned each piece of it with Brasso to remove the yuckiness and restore it to its original color.

Here is some before and after using the Brasso. Yeah, much better. As you can see from the nasty paper towels, those things had gunk all over them.


And although they looked much better, it still did not have the look I envisioned.

So I decided to go with some ORB (oil-rubbed bronze) spray paint.

Tip: If you need to spray paint small screws, an easy trick is to stick them down in styrofoam so you can cover them easily with paint.


Once everything cured up for a few days I put all the hardware back on and it was moved up to the nursery. 

One more of the Before...


And After!


I was nice and gave you a sneak peek of the nursery. Hopefully I can have finished nursery photos up soon! 

So that's my long tale of refinishing a dresser. It took some time and hard work but I'm glad I was able to do this for her. 

More projects coming soon!

Linking up here!


Pin It!

Monday, December 5, 2011

I'm back! And bringing some Christmas decor cheer

Hello to anyone still following along out there! Gosh it's been a while. Lot's going on over on my end. You know how they say when people stop bloggng for a while they are probably pregnant...and it's true for me! I am now 20 weeks along and due in April with a precious baby girl. We are thrilled! So since I was completely overcome with morning sickness (and it just recently began letting up) I haven't had much time or energy for projects. I should be able to get back on the bandwagon now and keep Mommy's Nook updated!

Today I'm sharing a little bit of my candy cane dining room Christmas decor. This was something new for this year and I'm loving how it turned out.


I first got the inspiration for this particular color scheme from the napkins. I had about two yards of this red and white striped fabric that I used at my son's birthday party. I thought it would make perfect little napkins so I whipped up 6 of them. Just measured and cut the same size as my other napkins and hemmed the four sides. Very easy.


Then I started searching for more candy cane/peppermint items to tie in. I found two 4 inch styrofoam balls at my local Dollar Tree and simply hot glued peppermints on them to make the peppermint balls. Side note: I have never seen this size styrofoam ball at the dollar store before and they only had these two. I was pumped since they were $1 each and are usually about $5 in craft stores. It took almost an entire bag of peppermints to make one ball if anyone wants to make one themselves. And it takes about 30 minutes. Quick, easy and cheap. Love it!


I had the faux poinsettias on hand already and just stuck them down in my pitcher to finish off the table. I can't ever have a real poinsettia since they are toxic and my cat enjoys nibbling on plants. Oh well!

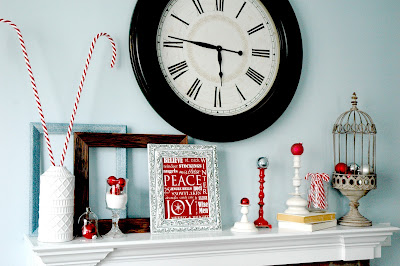
And here is the mantle with it's own peppermint spin.


I found the three candlesticks at the thrift store and spray painted two of them white and one red and then stuck some little ornaments on top. 


This adorable printable was free! Found it on Pinterest here


I piled some ornaments in the bird cage, stuck a few in a vase filled with sand, another under a small cloche and called it a day. I love grouping ornaments together in unusual places. They can go anywhere! I found the candy canes at the Dollar Tree as well and just grouped them together in a mason jar on the books. The two giant candy canes in the white vase were also found there.


There you have some fun and festive decor that would look great in any room. Happy decorating everyone! And Merry Christmas!


Pin It!

Wednesday, August 3, 2011

Linen Closet - Organized!

Let me just say that while I love things organized and in their own place, it's something I have to work at, meaning I'm not naturally prone to it. Now I'm not talking about basic cleaning and upkeep of the house. It's more of the inconspicuous things like closets, drawers and cabinets. You know, the stuff no one really sees but you know what's lurking behind those closed doors. I have to stop myself from shoving something into a drawer or cabinet for temporary purposes. Because before I know it, things can start to look like this...


Yep, totally embarrassed. So as to prevent further humiliation, I have decided to get every little space that is not organized whipped into shape. It is such a great feeling to have things nice and organized and I am determined to keep it that way. The first thing I tackled is our linen closet next to our guest bathroom. In case the photo above didn't give you a good view, here are a few more Before photos of the hall junk linen closet.


The first thing I did was pull EVERYTHING out of the closet into the next room to start off with it completely empty. I then sorted through the piles of stuff and started purging. Another confession...it's hard for me to let go of stuff sometimes, even things I never use...I just "might" use one day. I for sure have an inner hoarder that is just dying to be released. I refuse to let it happen though. 

Oh yeah, and that humongous made-for-a-gym-or-huge-house dust mop is outta here! My husband purchased it a long time ago thinking it would be great for doing a quick sweep around the house but storing this monster is too difficult. Not to mention it's hard to maneuver and I much prefer a regular broom. So buh-bye! 

After sorting everything, I calculated how many containers I needed and headed off to Target. Their latest ad listed some cute plastic crates for $3 each - score! I was quickly disappointed when I saw the end cap they were listed at was completely empty :( Back to School College folks apparently stocked up. So I moseyed around the basket section and decided on one $10 canvas tote for my sheets and pillowcases. After venturing to the other end of the store, my wandering eye caught sight of another end cap with 4 of the $3 crates! I took off full speed ahead for fear of someone snatching them from under my nose. I only needed 2 but I seriously contemplated buying all four. See? Hoarder tendencies...

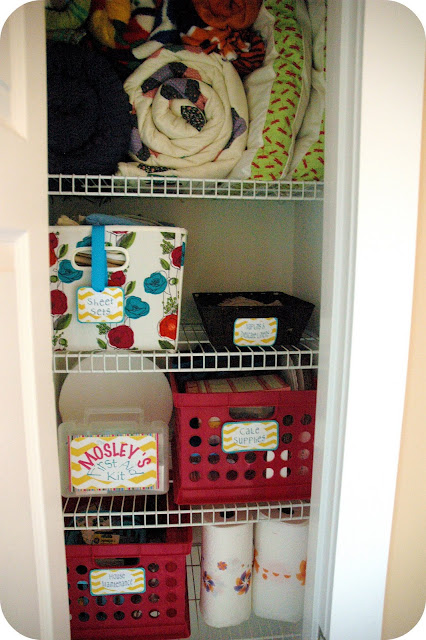
Okay, back to the closet. I used my two crates and organized one with all of my cupcake supplies (I have a small side "business" making mini cupcakes for showers, parties, etc.) and the second crate was used for house maintenance supplies. This includes small tool sets, light bulbs, command hooks and other miscellaneous things. I also used another basket I had on hand to hold linen napkins and some small delicate linens. 

I made a few labels for my new goods and started restocking the closet. I rolled my blankets instead of stacking them and they went back up on the top shelf along with two extra pillows. The next shelf is linens, third is baking supplies and the first-aid kit, and the bottom shelf is house maintenance and paper towels, leaving the very bottom of the closet for my hand-held vacuum and mop and mop bucket.

Here is the much-improved closet space!


And a few of the details...


Curious about the First-Aid kit? I just removed the sticker off the front and used a little of the always-awesome Mod Podge to adhere my label and scrapbook paper matte. Who says a first-aid kit can't be cute? :) :) :)


So there you have it, one horrendous closet revamped into a nice and organized space. I'm loving it! And it only cost me $16 plus tax :) I've got one more awful closet that's going to get revamped soon so stay tuned!

Pin It!

Sunday, June 12, 2011

Kiddo Chalkboard

When we bought this table and chairs from Ikea, I knew I wanted a chalkboard to add to our little guy's area in my new office.

And I took a $2.99 picture and frame from the thrift store and turned it into this!


I have been itching to try my hand at the chalkboard paint so I couldn't wait to get this project started. I found this piece of art from a thrift store for $3 bucks! Wait, have I already said that? Oh well, it's definitely worth the repeat :)


I pried off the gold trim on the inner part of the frame and then removed the picture from the frame.


Then it was time for paint! 


I originally painted the frame a bright sun yellow but since I failed to prime the frame, the wood still showed through a bit despite 30 million coats of yellow paint. Not to mention I didn't really like the boldness of the yellow so I opted to paint it with the yellow paint from my telephone bench which is Valspar's Lemon Curd.

The chalkboard painted very well and I was very pleased with how easy it is to use.


I purchased some small wooden letters from Hobby Lobby to paint and glued on the outer edges of the top and bottom of the frame. I thought they would be perfect for practicing little man's ABC's.


I just brushed on some craft paint with foam brushes, alternating colors with the letters.


After they were dry, I just hot glued them on, piece of cake!

Our little dude is already fascinated by the letters. I love how it turned out and it fits perfectly in his nook of the office.

Here's a few more afters for ya.


I have a few more projects left for the office and will hopefully have a big reveal soon. If you missed any of the previous posts on it, you can check out the brainstorming/kickstarting post, the revamped pink lamp, the precious yellow bench, my office chair and the thrift store credenza makeover.

Partying Here this week!
Keeping It Simple
Domestically Speaking
Photobucket
Chic on a Shoestring Decorating
The Shabby Nest


Pin It!