Tuesday, May 3, 2011

Heavy Hearts in Alabama

Our beautiful state was devastated last Wednesday by the violent tornados that ripped through our cities. The severity of damage is utterly heart breaking. The loss of life even more so. The death toll is over 250 statewide...with 300 more still missing. My heart aches and my emotions spill over into tears for those who have suffered such devastating loss. Their loved ones, gone. Their homes and all they hold dear, gone. Why did my family make it out without a scratch? Why do we still have our homes standing? Why did this deadly tornado lift into the clouds as it passed over our small town? Here is a map of the tornado's path that came through Tuscaloosa and worked its way up to Birmingham. Do you see where the pink line cuts off and the red line appears? The little space in between is where we live.


My husband, little guy and myself (along with the dog & cat) took shelter at my parents house, about 15 minutes away from our home and also contained in the little space on the map. My brother's family were also there since neither of us have a basement or storm shelter. They had no power so we no choice but to huddle in the dark basement...although we did have lots of flashlights and candles. We had a weather radio and family calling/texting us the current situation, informing us it was heading straight for us. Now let me be totally honest. I respect storms and the threat of tornados so I take a lot of precaution. I had huge pillows and blankets down there for us and we prepared a corner of the basement that was the deepest underground. But with that said, it still didn't hit me at how bad this could actually turn out. My brother had brought us some Arby's sandwiches and here I am slapping some Arby's sauce on my sandwich when the loudest clap of thunder I have EVER heard sounded and shook the house. I literally leaped onto my sister-in-law who was the closest person to me and screamed. My child who was eating french fries didn't even flinch. I was completely sick to my stomach from fear afterwards and needless to say, did not eat my sandwich. As it turns out that thunder/lightening was the tornado we had been dreading but was up in the clouds as it passed over us. My Dad was watching and saw the rain enveloped storm change directions once the lightening struck. It then came back down not a few miles away and continued its destructive path. When we knew the danger had passed, we roamed around the backyard and my brother found a receipt from Tuscaloosa (about 60 miles away) along with more bits of debris.

We knew the storm had passed by our home but at the time did not know if the tornado had actually been on the ground. My husband just knew our house was gone.  Thankfully, he was wrong. We had no damage.  Just a few more bits of debris. I found this in our yard, looks like some kind of building material.


Here is a video of the tornado in Tuscaloosa.


It was astonishing to hear the horrible news of how much destruction was left behind in this deadly storm's path. It made me realize at that point how close we came to being part of it.

So, why weren't we? Some friends and I were discussing this very question last night. We don't know the answer to such a question but we do know there was a purpose. Jesus wants something from us and I intend to find out. My prayer is that Jesus can use those left untouched and unharmed in whatever way he intended. May we open our eyes to see and ears to hear Him. I also pray that those who have suffered loss and devastation would look to Him for comfort, strength and courage to trudge ahead.

God is our refuge and strength, an ever-present help in trouble. Psalm 46:1


Have I not commanded you? Be strong and courageous. Do not be terrified; do not be discouraged, for the Lord your God will be with you wherever you go. Joshua 1:9

To anyone who may read this blog (I know some are not local), I ask for your prayers for our state, for those who are feeling discouraged and bereft. There is a long road to recovery up ahead and those involved need your encouragement. If you are able to do more, there are many ways to send support and donations for those in need.

Please visit ServeAlabama.gov for more information.

What humbles me is the fact that disaster can happen anywhere, to any of us. I was foolish to think something of this magnitude would never happen in Alabama. Our world is continually being struck, whether it is a natural disaster...earthquakes, tornadoes, hurricanes, tsunamis, or the threat of terrorist attacks. I urge you to ask yourself...am I ready? Would I be ready to leave this place and meet Jesus?

For God so loved the world that he gave his one and only Son, so that whoever believes in him shall not perish but have eternal life.   John 3:16


For the Son of Man came to seek and save what was lost.   Luke 19:10

I truly believe God shakes us to humble us. He is sovereign and in control and sometimes we lose sight of it, getting caught up in ourselves and thinking we are exempt from destruction. Praise Jesus for his continuous grace and love for us. We don't deserve it but I am so thankful he gives it.

We will praise Him in this storm.

Pin It!

Sunday, April 3, 2011

Spring Mantels

Ahh, spring is in there air...or it was anyway. It rained pretty much all last week and the temp was freezing in the 40's and 50's. We were spoiled by those warm sunny days over the last few weeks. What a tease. Oh well. That's Alabama weather for ya. We did end up with a beautiful sunny weekend but alas, rain is back in the forecast tomorrow...

Despite the craziness in the weather, I'm completely in spring mode around here and finally finished up my spring mantel in the dining room. It's the one mantel I have that I really enjoy changing and decorating. The living room mantel is dominated by the Direct TV box and DVD player...except of course for my newly updated frame and candlestick :) And I have one small decorative area on the other side of that mantel sporting some fresh spring decor. I'll show you that too. But honestly now, why must those cable boxes be so large? You would think they could make them a little smaller...I'm dealing with the same issue in our bedroom. Ah, but I digress.

On to the mantel.

Before I show you the dining room mantel, here's that shot of the living room mantel mentioned above. It wanted to show it's poof of spring too :) And in case you are wondering, we have a doubled sided fireplace, one side in the living room and the other in the dining, thus the two mantels.

I picked up the little Blossom planter at Michael's on sale for about $4.00. The moss I had on hand and I dropped in a few moss stones from the Dollar Tree - heck yeah! They have a whole section of floral stuff so I stocked up on some goodies. Then I put a few faux hydrangeas in a mason jar, all on hand. And poof! a little spritz of spring.


And for a little reminder on the other side.


Now for the Dining Room side.

Here's a Before picture with my winter scheme.


And now for the spring! I totally love my trio of empty frames so they will probably be around a little while. I may move them elsewhere eventually but I just love how they look here. I spray painted the two blue frames (both from the thrift store) with some textured blue spray paint I got on clearance at Michael's. The brown frame I bought on clearance at Michael's for $5.00. I painted these before my blog debut so no process pics. Sorry!


The glass vase was bought on clearance at Hobby Lobby for $4.00 and the yellow stems were $1.99 and then half off. So all three for $3.00. 


The little green planter box was purchased at Michael's for about $5.00. I bought small twiggy wreaths at Hobby Lobby for the "nest" for like $2.00 and I also bought the eggs there. It was a pack full of like 8 eggs and I believe they were about $2.00 for the pack. I added more of those moss stones underneath the nest to give it some lift.


I bought the glass pitcher a few months ago at a thrift store for $4.00 and I love this piece! I sat it on top of an old hymnal that I picked up at the same thrift store for a buck or two. The other book is a Jesus Freak book that we already owned. It has awesome frayed edges. Love my Jesus! And that little birdie there I picked up at Hobby Lobby when they first started putting out spring stuff. He was about $4.00 because none of the spring decor was on sale yet. I went back about a week ago and they have no more birds! Sad. I wanted another one.


My biggest splurge was the birdcage. I have always wanted one of these and I fell in LOVE with this one when I stumbled on to it at TJ Maxx. He was $16.99 which is still a good price for such a pretty piece. 


One more look at the whole view.


Thanks for stopping by - hope you enjoyed my little taste of spring!

Partying Here!

Keeping It Simple
Pin It!

Tuesday, March 29, 2011

Southwestexican Casserole

Recipe Time!

You may be wondering about that title but that's what I'm calling the dinner I made last night. It's my take on a combination of Southwestern and Mexican food in casserole form. Some of my friends have made a Mexican-ish casserole before but I didn't have the recipe so figured I would whip up something on my own, adding in some of our favorite ingredients.

Before I get to the ingredients, let me just say it turned out delicious!!! That's one reason I am typing up this post now so I won't forget how I made it. It is also very easy to put together. I used frozen veggies because I had them on hand. It saves some prep time if you don't have to chop up fresh ones. I loves them for soups and recipes like this one.

1 lb ground chuck
1/2 cup each of frozen chopped onions and green bell pepper
1 packet of taco seasoning
1 can whole kernel corn, drained
1 can black beans, drained and rinsed
5-6 large flour tortillas
1/2 cup chicken broth
1 bag of shredded Mexican mix cheese

Optional - 1 cup sharp shredded cheese

Preheat oven to 350 degrees. Brown the ground chuck (I seasoned with salt, pepper & garlic powder) and drain off any fat/grease. Add frozen veggies and taco seasoning mix. Follow the instructions on the seasoning packet for how much water to be added and how long to simmer the mixture. Once the taco meat/veggies are done, add the corn and black beans stirring until combined.

Grease a 9x13 pan. Using a pie plate or something similar, pour in the chicken broth and dip the tortillas until soaked. Line the pan with a layer of tortillas. You will have to tear them to fit right. Add a third of the meat mixture to the tortillas. Add a layer of cheese. Repeat for two more layers, ending with cheese on top. I also added a little bit of shredded sharp cheddar cheese just because I love cheese :)

Bake for 25-30 minutes. This is great by itself but you could also serve with salsa or any other toppings you like. I was going to add some Spanish rice to the casserole but I was trying to hurry with dinner and forgot to make it. Oh well, maybe next time.

Now I'm going to be honest about why there are no pictures. It doesn't look very pretty. I am a visual person when it comes to food and I didn't want anyone to get the wrong impression and not even try this dish. The pictures I took of it just did not do it justice and I am choosing not to display any :) Just trust me when I say this meal is delicious!

Enjoy!
Pin It!

Monday, March 28, 2011

Thinking Pink...In the Office

The office/craft room and little bit of play room is finally starting to pull together. I have finished a few projects for the space, including my yellow wreath and thrift store office chair. Now one more is checked off the list, a pink lamp!

You know most of us if not all went through the pink phase as a young girl and most likely had a pink room. That was definitely me. I loved pink. When my mom asked me what kind of party I wanted for my third birthday, I replied "Pink!" And that's exactly what I got...EVERYTHING was pink :) I even got a pink tricycle.

Here's a little bit of proof that Mom just sent me...excuse the busted lip, there's no telling how that one happened.


I eventually grew out of the "everything must be pink" phase and have never really used it in my home as an adult. Until now. No, it's not going to look like Pepto Bismol barfed everywhere but I'm excited to incorporate these fun pops of pink. I think the color just screams feminine and that's exactly what the majority of the space will be...except for my little P's nook. Side note: Yellow is also my accent color for this space. I love the combo!

But back to the lamp. I found this at a local flea market for $8.00. And it is huge!!! And obviously hideous as is. But she spoke to me and found her way into the back of my car. At this point I didn't know what color to paint it but I knew I wanted a bold color to make it pop.


So when I decided on my color scheme for this room I knew pink was the answer. Rust-Oleum's Berry Pink, to be more specific.


So after I got the lamp all cleaned up, I sprayed several a few coats until she was nice and glossy and PINK!

The shade it came with was not going to cut it so I went out searching for a replacement. I found one at Target and purchased it...$22.00. Is that a good price for a large lampshade? I'm kind of clueless in that area. So I'm not sure if I'm keeping it, hence the plastic still showing in the pictures. I may try to find a better deal so in the meantime, it will continue to live with it's plastic wrap.

Here she is!


Overall I am totally digging this fun lamp in my office. And if you are wondering what it is sitting on, that's just a sneak peak of my revamped credenza! It's done except I am still searching for the right drawer pulls. One was missing so I can't use the originals. I'm hoping to find them soon!

And here's a little ambience lighting for ya.


L.O.V.E.
Can't wait to share more of the space soon!

Partying Here!
The DIY Show Off
Keeping It Simple
Domestically Speaking

Photobucket


Transformation Thursday
Chic on a Shoestring Decorating


Pin It!

Saturday, March 26, 2011

Francine Rivers

Oh how I love Mrs. Rivers' books. She is without a doubt my favorite author. I get completely giddy when a new book of hers comes out. If you are looking for some great Christian fiction books, look no further. Every book of hers that I have read (which is just about all of them) is phenomenal. My absolute favorite series is the Mark of the Lion trilogy. I can read that series over and over and it never gets old. She recently released a two-part series of books, Her Mother's Hope and Her Daughter's Dream. Her book tour for Her Daughter's Dream came to our city and yours truly was ecstatic!

A friend of mine and myself went down to get our books signed by Francine and of course I brought my camera. She was very sweet and listened to the two of us babble like idiots and gush about how much we loved her books. I'm sure it wasn't the first time she experienced a pair like us :)

And here is our photo that I framed and hugged for 3 days. Okay, not really. But I am absolutely thrilled to have gotten a photo with Francine!!!!
Cheese!


The fab news is Francine's publishing company, Tyndale House Publishers, is having a giveaway of Francine's books! The grand prize winner gets her entire library of books and several more winners get some of her other awesome novels.

To enter you can do one or all of the below criteria. You get one entry per item you complete. Do all three and get three chances to win!

Per Tyndale's Blogpage:

- “Like” the Francine Rivers Facebook page
- Invite at least 10 friends to “Like” the Francine Rivers Facebook page (using the “share” link of Facebook or through e-mail).
- Share this contest on your blog, Twitter, or Facebook page.

Go check out the website and complete the entry form, marking which items you completed to enter the contest. Trust me, you want to get your hands on as many books of Francine's as possible.

Best of luck!
Pin It!

Thursday, March 24, 2011

Quickies

Alright, get your mind out of the gutter. This isn't that kind of blog my friends.

I'm referring to some quick thrifty makeovers that I just love. I have a huge little problem with starting too many projects at once. I can't help it. That's how my brain works. I have an idea and I want to do it then. And I simply rotate projects until they are all done :) Hubby doesn't understand my mentality but hey, it works for me.

So in the midst of some larger projects I have going on, I up and decided to tackle a few pieces to help update my spring decor. And since I hadn't used my new Oops paint in 24 hours, I was itching to break out the paint brush.

I had some TJ Max frames in my living room that were pretty but blended in with my dark walls. I was just sitting there staring at them and said "I'm going to go paint those frames" and up I went to the garage, frames in tow. Hubby is calling after me "Do you really have to paint everything in the house?" We shall see...

Both frames Before...


I used a foam brush and applied the same technique as I did on my bedroom wall plaques. I painted the larger frame with some leftover paint, Behr's Swiss Coffee. And I painted the smaller frame with my grey blue Oops paint.

In addition to the frames, I spray painted a thrift store candlestick a nice glossy white.

Here's a Before of the candlestick. $2.99!


And the After of the candlestick and the smaller blue frame. Perfect for our family beach picture :)


And the After of the larger white frame. Sorry the lighting was bad on this photo. Little P was only 9 months old here, sweet boy.


A total improvement on these little lovelies. It truly is amazing what a little paint can do. I'm hooked!
Pin It!

Sunday, March 20, 2011

My Girl...Office Chair

Another item checked off the to-do list for my new office/craft room. I am slowly but surely completing the pieces to get this room finished!

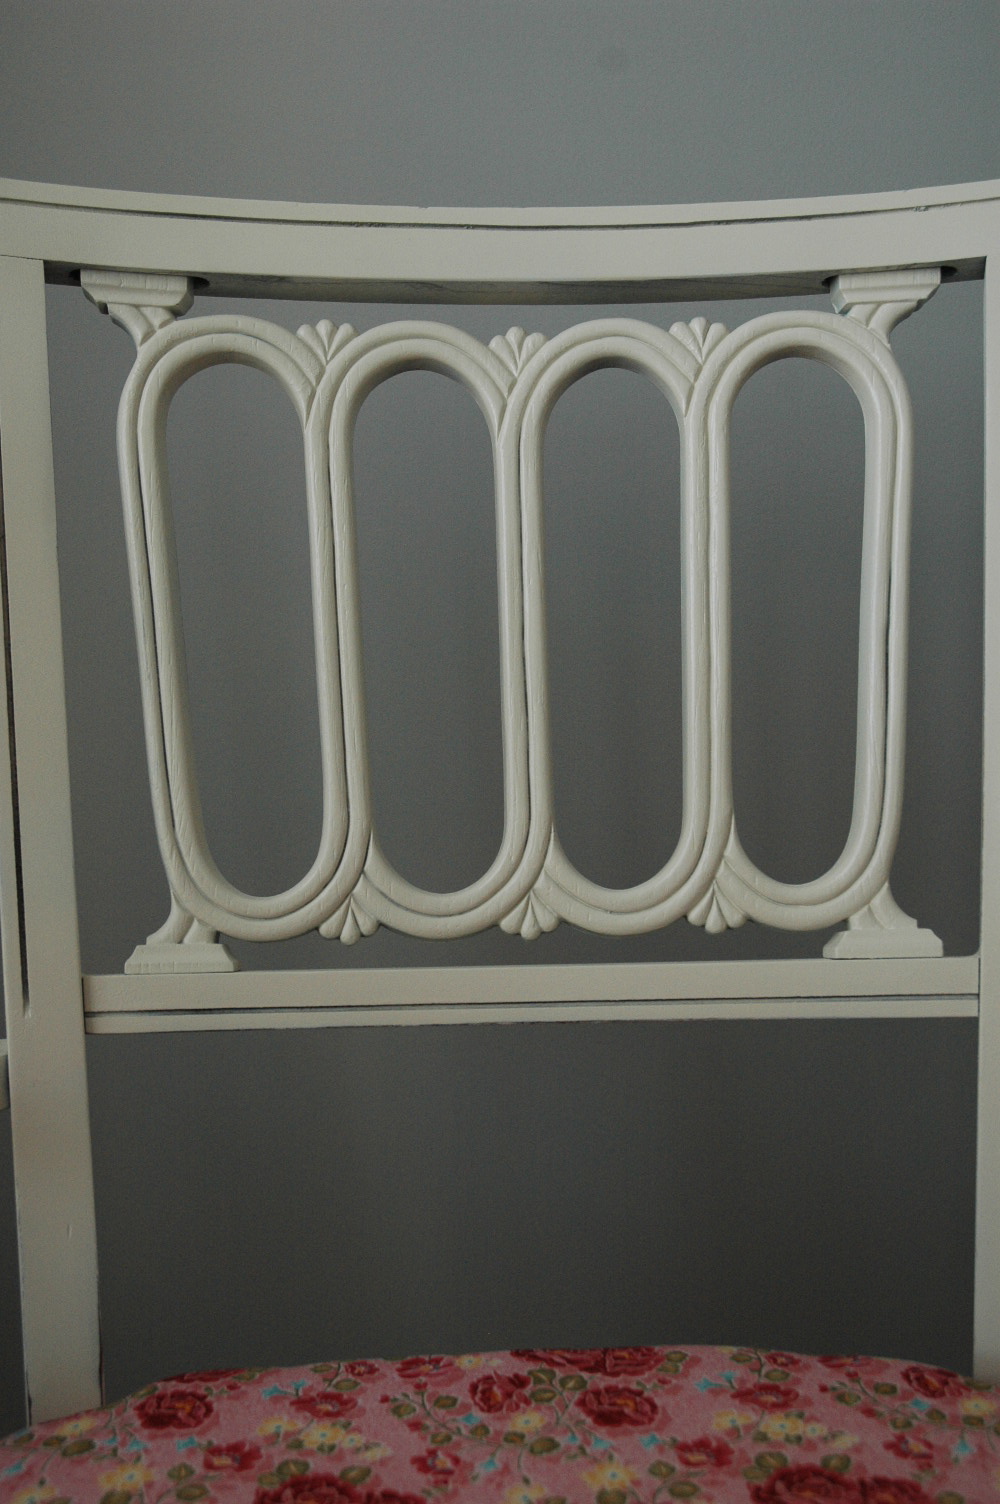
I picked up this chair at a thrift store for $10.00. I thought the back of the chair had a lovely design. All it needed was some reinforcement, new paint and a new cushion.

Okay, before all the details I'll be nice and let you see the Before and After :)

And the Icky Before...


Drumroll please...Ta Da!

Total girl chair :) :) :) :) Me likey.

Now onto the lovely details.

The first thing I did was remove the cushion. It was very simple. There were four screws in the bottom of the chair and I loosened them up and the cushion popped right off.

A view of the disgustingly worn out seat cushion

Removing the cushion

Next up I gave it a good sanding and wiped it down. It was a little rickety so I blobbed wood glue down in between the joints. Now obviously I am no pro but this process seemed to work :) I wiped away the excess and let it dry overnight.


Next I primed it with Rustoleum's white spray paint primer. I did a few coats and let it completely dry. 


After the primer was completely dry, I lightly sanded it down to smooth out the surface. This is definitely a step you don't want to skip. It certainly makes a difference. I used Rustoleum's Heirloom White and coated the chair about 3 times. I also bought one of these handy little spray guns for like three bucks. It's totally worth it. It helps get a smooth spray and also avoids the annoying finger cramp from holding down the nozzle.


Once again, after the paint completely dried, I lightly sanded out any rough bumpy areas and made it nice and smooth. I also sanded a few of the edges to give a little bit of the distressed look. I just couldn't resist...

And finally, I added a coat of Wipe on Poly to seal the paint and protect the surface. Sorry no pic of the Poly can. I forgot.

Now on to the seat cushion. The existing cushion was pretty thin and honestly grossed me out so I purchased a piece of foam, batting and of course my new fabric.

But before we get to the new stuff, I had to get rid of the old...ugh. There were 3 layers of fabric on top of the existing cushion. That also means there were 3 layers of old staples...each layer containing more rust than the last. I just knew I was going to end up jabbing myself and rushing to get a tetanus shot. But I was very careful and finally removed all of the nasty little things.

Once I got the base wiped free of rust dust I noticed it had some loose wood. Out came the wood glue again and I sealed 'er right up.


Alright, we are finally getting to the new cushion. I bought both my foam and batting at Hobby Lobby. It was about $10 for both items and I still have lots of batting leftover for future projects. I purchased my fabric at Hancock's for about $4.00.


This was my very first time to recover a chair so I kept avoiding this part as long as possible.  But hello, gotta have a cushion for the chair, Laura. So I jumped in there and just learned as I went. My foam square was not quite as wide as I originally thought (note to self: measure before you go to the store) so I improvised. Since the back part of the base is cut to mold to the chair, I needed to cut my foam the same way. I took off a square chunk from each side of the back and put the two chunks up front. It made the front of the cushion be as wide as the base and make it even. Of course I didn't have enough to go all the way down the sides but I think it turned out just fine anyway.


Warning: Blurry Photo Alert

I then wrapped the batting snugly over the foam and stapled to the back. I started by stapling the center of each side and then worked my way around. 


And side note. At this point I took the cushion inside to cut my fabric to fit and iron it. I left the cushion unattended in the floor while I ironed the fabric and when I returned, the cat had gotten on top of the cushion and rumpled up the nice and tight batting...he almost got booted off the blog for that little stunt. So I huffed and puffed at myself for leaving it alone with him snooping around and went back out to fix the damage. It wasn't too hard to fix so I apologized to him for my rudeness. 

I stapled on the fabric and that was it - all done! I really love it. I wanted something very feminine and I think I pulled it off. The fabric pattern has little bits of yellow in the flowers so I think it's going to look great with the color scheme of the new space (grey, pink and yellow). 

And a ton few more after pics.


And because I felt bad for getting on to him earlier...he forgave me :)


I hope you enjoyed the makeover. More to come!

Partying Here!


  The DIY Show Off
Keeping It Simple
Pin It!